How to Install: Anti-Scald Valve
Learn how to install an anti-scald pressure balancing valve, why you need one and the considerations for purchasing.
Learn how to install an anti-scald pressure balancing valve, why you need one and the considerations for purchasing.
If your home doesn’t have an anti-scald pressure balancing valve, chances are you get a painful reminder every time you take a shower. That’s because a sudden change in water use, e.g., from someone in your household flushing the toilet, can turn your nice warm shower into a dangerously hot, potentially scalding shower.
What is an anti-scald pressure balancing valve?
An anti-scald pressure balancing valve is a special device that’s built into the shower handle and regulates the water pressure from the hot and cold water lines to prevent sudden, extreme changes in temperature.
Nowadays, new construction codes require these kinds of valves, but if your home is a little older, it may not have any installed. If your shower doesn’t have one, your water temperature may get so hot it can cause burns. To prevent burns, experts recommend limiting your tap water temperature to no higher than 120º F.
Why you need an anti-scald pressure balancing valve
Lowering the temperature of your hot water is unsafe. Temperatures below 120º F in your water heater can foster the growth of unhealthy bacteria. When your water heater is set to 140º F, it kills harmful bacteria; but water from your shower at this temperature can cause a third-degree burn in only 5 seconds. Installing an anti-scald pressure balancing valve can help prevent burns and allow you to prevent bacterial growth in your water heater.
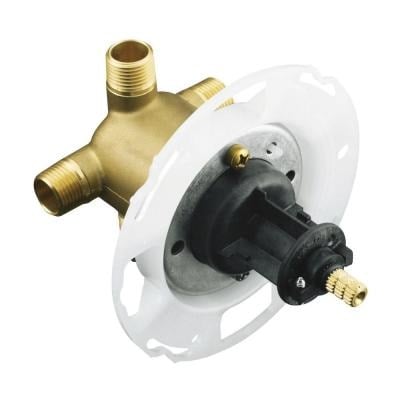
Image via Home Depot
Considerations for purchasing an anti-scald pressure balancing valve
Before you even think of heading to the hardware store, you’ll need to take measurements. Your measurements will tell you how much room you have inside the shower wall to fit the valve.
You’ll also want to check the size (diameter) of your existing pipes so you can match the size to your new valve openings.
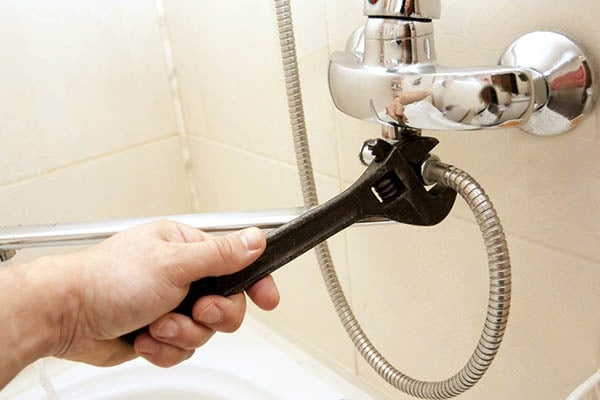
First, remove the shower handle (the knob you turn to adjust the temperature and water flow) and the plate covering the inner workings of the fixture. This is called the escutcheon plate. Depending on the screws in the escutcheon plate, you’ll either need a flat head or Phillips-head screwdriver.
Next, measure the distance from the outside of the tile to the center of the pipes in the wall. This is your setback allowance. You’ll use this measurement to choose a valve that will fit nicely in the space you have. This will make installation much easier.
Learn how a protection plan can help with covered faucet and valve breakdowns.
Install the anti-scald pressure balancing valve yourself
If you’re handy and have the right tools, installing a valve like this yourself can save you several hundred dollars. But as far as DIY projects go, this one will require plumbing expertise, specialty tools and materials, and quite a bit of time. Even for an expert, this can be technically challenging and time consuming.
Items you may need:
• Screwdriver(s) - Phillips and or flat head variety
• Adjustable pliers
• Adjustable pipe wrench
• Safety goggles
• Reciprocating saw with metal-cutting blade
• Diamond blade for cutting tile
• Soldering iron with flux (if you’re working with copper pipes)
• Support blocks, pipe straps
• Plumbers putty
• Digital thermometer to measure water temperature
Step-by-step installation instructions
Some of the installation and assembly will take place while you’re positioned in the shower, and some may need to take place from behind the pipes through an access hole. If you don’t already have an access hole, you’ll need to make one. By having an access hole, you won’t have to cut out a lot of tile to reach the pipes while you work. Note: This may require additional tools and materials for cutting drywall and patching.
1. Turn off the water supply to the shower and remove the tub spout and shower arm.
2. Use the escutcheon plate you’ve removed as a guide to determine how much tile you can cut away to access the pipes. Simply place it against the tile and trace around it as a template. (Be sure to allow for some overlap. Otherwise, you’ll have a gap between the tile and the cover plate when you go to reattach it.) Then use a diamond blade to cut away tile to allow access to the pipes. Don’t forget to wear safety goggles!
If you can’t cut away enough tile to easily access the pipes from the front, you will need to move to an access position behind the pipes.
3. Use your reciprocating saw equipped with a metal-cutting blade to cut the supply lines where the new shut-off valves will go. You’ll need to wear safety goggles again! Remove the old faucet valve and piping above where you cut.
4. Using the old pipes you removed as your guide, size up your new anti-valve piping. Dry fit the new assembly to the existing hot and cold water supply pipes.
5. Unscrew and remove the valve spindle inside the new valve. Set this aside in a safe spot for the time being. In a little bit, you’ll put this back in the valve and position it to control the water pressure so it can limit the flow of the hot water to prevent scalding.
6. Once you have a good dry fit, dissemble the pipes.If you’re using copper pipes, apply flux to all the fittings, then reassemble them for soldering.
7. Open the shut-off valves and solder the new valve to the water-supply pipes. Secure the valve and pipes with support blocks and pipe straps.
If you’ve been working on the plumbing from behind, now go back to the shower side (front).
8. Reinstall the valve spindle that was previously removed in step 9. Turn the water supply back on and check for leaks. Adjust as needed.
9. Reinstall the tub spout and the shower arm.
10. Slide the shower handle back on and turn on the water. This will allow you to test the valve and set the spindle so that the hot water cannot exceed the limit you set.
Behind the handle and inside the anti-scald valve is a gear-like rotational stop. This stop puts a limit on how hot the water can be. Once you get it where you want it, you can put the handle back on. Then, if you ever need to adjust it, simply remove the handle and reposition the stop.
11. Rotate the handle to hot. Feel the temperature of the water with your hands and make sure it’s comfortably warm, but not too hot. For an exact temperature reading, use a digital thermometer.
12. Roll a ball of plumber's putty between your hands to form a long ½-inch-diameter rope. Press the putty against the upper, rear section of the valve's cover plate.
13. Screw the cover plate to the shower wall centered over the valve. Scrape away any excess putty that squeezes out from behind the cover plate.
14. Slip a rubber gasket behind the rear, upper section of the escutcheon plate and the shower handle. Finish tightening the screws.
TIP: If your model requires a small hex wrench to lock/unlock the valve handle to change the water temperature, be sure to store in a safe place that you’ll remember!
For complicated installations like this, you may find the expertise of a professional, licensed plumber to be worth the added expense. But if you do decide to do it yourself, you now know the basic steps to get the job done right.
It's also a good idea to consider home warranty coverage to protect the systems and appliances you rely on every day like your HVAC, plumbing, electrical, refrigerator, washer and dryer, and more. With a home warranty plan from American Home Shield, we'll repair the covered item and ensure you get a trusted, qualified Pro fro the job.
Contributing American Home Shield plumbing expert, Wes Beason, NW Sundance Services
AHS assumes no responsibility, and specifically disclaims all liability, for your use of any and all information contained herein.

Have a plan for your home when things don't go according to plan
Shop Home WarrantiesDevelopment