

  1. Home Warranty
  2. Blog
  3. Quick Home Tips
  4. 13 Simple Steps to Switch a Light Fixture Into an Outlet
bulb changes

13 Simple Steps to Switch a Light Fixture Into an Outlet

bulb changes

You can never have enough outlets in your home. Adding outlets can be hard, but it is made easier if the wiring already exists. Check out these simple steps to turn a light fixture into an outlet.

If there’s one thing every house needs more of, it’s electrical outlets. When basically every member of your household has a smartphone, a tablet or a laptop, plus other personal electronics like televisions and game consoles, there are never enough places to plug in. And that’s not taking into account all the other electronic gadgets that most people have in their homes these days.

Fortunately, it’s easy to add more outlets to your home without calling an electrician. Most homeowners find wiring an outlet to be one of the simpler DIY electrical projects. Follow these steps to learn how to remove a light fixture and wire an outlet in its place.

1. Buy a New Receptacle 

You’ll need to purchase a new receptacle (outlet) and receptacle cover at your local hardware store. You’ll probably need to get a round receptacle cover, especially if you have an octagonal junction box. 

If you want to continue having a light in the fixture but need a receptacle as well, you can install a lamp-holder-to-outlet adapter instead. You don’t even need to know how to replace an outlet if you use an adapter. They screw right into the outlet and contain both receptacles and a light bulb socket. If you don’t need a light in the fixture, or don’t want to make permanent changes to the fixture, you can buy an adapter with just a receptacle.

2. Gather Your Tools

You will need:

  • Needle-nose pliers
  • A screwdriver
  • Wire strippers
  • A non-contact voltage sensor

Making sure you have the right tools on hand before you start the job will cut down on frustration.

3. Cut the Power

To avoid electrocuting yourself, turn off the power to the light switch at the main circuit panel.

4. Unscrew the Light Fixture

First, remove the glass globe or other covering from your light fixture. Then locate the mounting screws that attach the fixture itself to the junction box and remove the fixture.

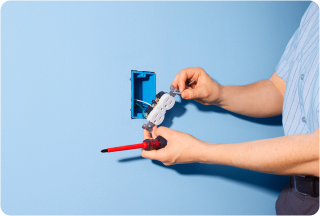
5. Disconnect the Wires

Once you’ve removed the screws affixing the light fixture to the ceiling, disconnect the wiring to your light fixture. Either remove the wire nuts or unscrew the screws holding the wiring in place.

6. Set Aside the Light Fixture

Hang on to it, as you might want to install it elsewhere or put it back later.

7. Restrip the Wiring

You may need to restrip the ends of the wires coming out of the junction box. Cut off the previously stripped ends and restrip the wires to expose about half an inch of copper.

Successfully increased your home's value?

Sounds like a perfect time to find the warranty that fits you best.

8. Identify Your Wires

You should see three wires coming out of your junction box: white, black or red, and green or bare copper. Black and red wires are usually hot, while white wires are either neutral or hot. Green or bare wires are always used for grounding.

9. Add Screw Loops

Screw loops are small hooks on the end of your wires, which are used to attach them to the screws on your receptacle box. Use your needle-nose pliers to bend these hooks into the ends of your wires.

10. Connect the Wires

Once you have added screw loops to your wires, it’s time to hook them up to the receptacle. Hook the screw loop in your black or red wire around the top brass screw in your receptacle and tighten it. Hook the screw loop in the white wire around the top silver screw in the receptacle and tighten it. Hook the green or bare wire around the green screw in the receptacle and tighten it.

11. Mount the Receptacle

Using the mounting screws on either side of your receptacle, mount it to the junction box. 

12. Test the New Outlet

Before you cover your new outlet, switch the power back on and test it to make sure it’s working properly. This will make it easier to troubleshoot any issues with the new receptacle.

13. Install the Outlet Cover

If you have an octagonal junction box behind your new receptacle, you may need to buy a special round outlet cover to install over it. Otherwise, you can use a normal, rectangular outlet cover. If the hole in your ceiling is larger than your outlet cover, you may need to patch it in order to make the opening for the receptacle smaller. It’s a good idea to do this before installing the new receptacle.

Once you’ve installed your new outlet cover, you’re ready to use your new receptacle. For more complicated electrical jobs, American Home Shield® can help. Our home warranties provide protection for parts of up to 23 home systems and appliances, including electrical wiring. Go online to American Home Shield today and find the right plan for you.

Share:

AHS assumes no responsibility, and specifically disclaims all liability, for your use of any and all information contained herein.

American home shield short logo mark

Don't worry. Be warranty.

Have a plan for your home when things don't go according to plan

Shop Home Warranties

Development